🔥 LIMITED: 100 Unlimited Lifetime Deals — 19 claimed! Get yours from $149* before it returns to $229. Use code: 100usersdiscount
* 50 licenses: $149 · Next 50 licenses: $179

Documentation
Go back to main docs page
How to use Rive element
1. Export your Rive file
Watch the video below to learn how to export your Rive file URL, also read the
Before animating your Rive element using this plugin, you need your rive file rive.app
Watch the video below to learn how to export your Rive file URL, also read the
step-by-step instructions underneath.
- Once you’re happy with your Rive file, press the Export button on the toolbar.
- Click on export button then click export for runtime
- Save the file which url will end with .riv file extension
2. Add the Rive element to your page builder
Now lets see how you can add the Rive element to your page using your preferred page builder, this plugin is compatible with Bricks builder, Elementor and Divi 5.
Below are tutorials for each builder, select respective builder and watch the tutorial to see how to add rive element to your page.
First make sure to upload the .riv file which we exported in previous section and upload it to your wordpress media library, we will need that file url to add the rive element.
3. *Add the Rive element to any theme / page builder
*Support Policy: Official support is strictly provided for Bricks, Divi 5, and Elementor. While the shortcode is designed to be compatible with most setups, we cannot provide technical support for issues arising in other themes or builders. We recommend testing thoroughly on your specific setup to ensure it meets your needs.
You can add Rive element to any other theme or page builder via shortcode given they have the plugin installed.
Add this function via plugin like code snippet or any other code snippet plugin.
Add this function via plugin like code snippet or any other code snippet plugin.
/**
 * Shortcode to render Rive element
 * Usage: [akdev_rive id="my-rive" url="..." artboard="Truck" sm="bumpy" loadingmode="lazy" fit="Cover" height="400"]
 */
add_shortcode( 'akdev_rive', function( $atts ) {
    // 1. Parse attributes
    $pairs = shortcode_atts( array(
        'id'       => '', // User MUST provide this
        'url'      => '',
        'title'    => 'Rive Animation',
        'artboard' => 'Truck',
        'sm'       => '', // State Machine
        'fit'      => 'Contain',
        'width'    => '100%',
        'height'   => '500px',
		'loadingmode'=>"eager",
		'lazyloadoffset'=> "200px",
		'riverenderer'=> "WEBGL2"
    ), $atts );

    // 2. Validation: ID is required for your JS to target the element
    if ( empty( $pairs['id'] ) ) {
        return current_user_can('edit_posts') ? '<p style="color:#d63384; font-weight:bold;">[Rive Error: Please provide a unique "id" attribute]</p>' : '';
    }

    $element_id    = esc_attr( $pairs['id'] );
    $rive_url      = esc_url( $pairs['url'] );
    $rive_artboard = esc_html( $pairs['artboard'] );
    $rive_sm       = esc_html( $pairs['sm'] );
    $rive_fit      = esc_attr( $pairs['fit'] );
    $content       = esc_attr( $pairs['title'] );
    $loading_mode       = esc_attr( $pairs['loadingmode'] );
    $lazy_offset       = esc_attr( $pairs['lazyloadoffset'] );
	$rive_renderer =  esc_attr( $pairs['riverenderer'] );

    // 3. Format Width/Height Helper
    $format_dim = function($val) {
        return is_numeric($val) ? $val . 'px' : $val;
    };
    $width  = $format_dim($pairs['width']);
    $height = $format_dim($pairs['height']);

    // 4. Register data with your existing Assets class
    // We run this on both frontend and backend to ensure scripts know the data exists
    if ( class_exists( 'Akdev_Animation_Assets' ) ) {
        Akdev_Animation_Assets::add_rive_items( [[
            'id'            => $element_id,
            'content'       => $content,
            'rive_url'      => $rive_url,
            'rive_artboard' => $rive_artboard,
            'rive_sm'       => $rive_sm,
            'rive_fit'      => $rive_fit,
		 'loading_mode' => $loading_mode,
        'lazy_offset' => $lazy_offset,
			'rive_renderer'=> $rive_renderer,
        ]] );
    }

    // 5. Get global options
    $lenis_opt  = get_option('akdev_option_lenis');
    $mobile_opt = get_option('akdev_device_size_mobile');

    // 6. Build the HTML Output
    return sprintf(
        '<div class="akdev-rive" style="width:%s; height:%s; overflow:hidden;">
            <div
                data-scroll="%s"
                data-mobileMaxWidth="%s"
                data-id="%s"
                class="akdev-rive-wrapper"
                style="height:100%%;width:100%%;"
                data-rive="%s"
                data-rive-artboard="%s"
                data-rive-sm="%s"
                data-rive-fit="%s"
                data-name="%s"
				data-loadingMode="%s"
        		data-lazyLoadOffset="%s"
				        data-rive-renderer="%s">
            </div>
        </div>',
        $width,
        $height,
        esc_attr($lenis_opt),
        esc_attr($mobile_opt),
        $element_id,
        $rive_url,
        $rive_artboard,
        $rive_sm,
        $rive_fit,
        $content,
	$loading_mode,
		$lazy_offset,
		$rive_renderer
    );
});
Now to add Rive element in any unsupported theme or page just add a shortcode or code element on your page and add shortcode like the shortcode below.
[akdev_rive id="my-rive" url="http://izhuruissue.local/wp-content/uploads/2026/05/surfing_edgardo.riv" artboard="New Artboard" sm="State Machine 1" fit="Cover" width="400px" height="400" riverenderer="canvas" loadingmode="lazy" lazyloadoffset="400px"]
Watch the video below where I add Rive element in a Wordpress 2025 theme via gutenberg block editor using a shortcode block.
*Note on Shortcodes: This shortcode is a universal workaround for themes outside of our officially supported builders. Please note that the Rive element will not render inside your page editor's preview, but it will work perfectly on the front end of website and within our Animation Builder as far as I have tested.
*Support Policy: Official support is strictly provided for Bricks, Divi 5, and Elementor. While the shortcode is designed to be compatible with most setups, we cannot provide technical support for issues arising in other themes or builders. We recommend testing thoroughly on your specific setup to ensure it meets your needs.
Available fields for Rive element
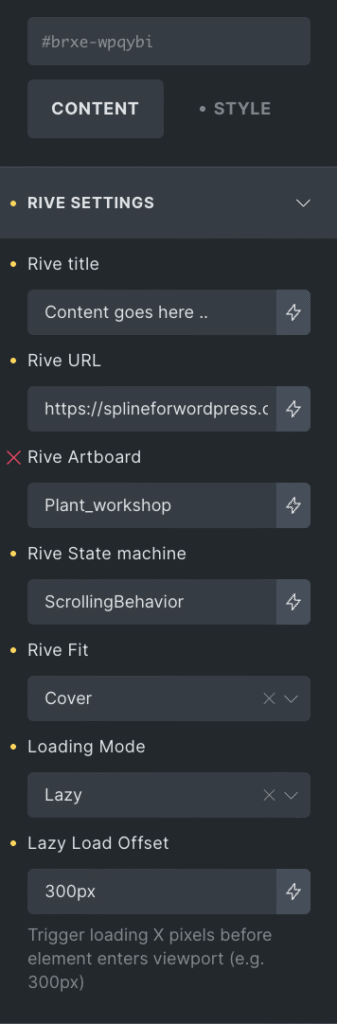
There are 7 available fields for Rive element to use
Rive Title: A decorative label to help you identify your elements (e.g., "Rive in desktop" vs "Rive in mobile").
Rive URL: The .riv file exported from rive.app in the previous section; upload it to your media folder and copy the URL.
Rive Artboard: The specific artboard within your Rive file that you want to display.
Rive State Machine: The name of the specific State Machine you want to trigger. This allows you to interact with the animation's logic (like hover effects or click transitions) via the plugin.
Rive Fit: Determines how the animation scales within its container.
Loading Mode: This field controls when the Rive resource starts downloading and rendering (Eager is default).
Loading Mode: This field controls when the Rive resource starts downloading and rendering (Eager is default).
Eager: The Rive resource starts loading immediately as soon as the page begins to load. Use this for "Above the Fold" content (like a hero section).
Lazy: The Rive resource only starts loading when it is close to entering the user's viewport.
Lazy Load Offset: This works in tandem with the "Lazy" mode. It defines the buffer zone (in pixels or %) before the element reaches the screen, 300px is default.
Lazy Load Offset: This works in tandem with the "Lazy" mode. It defines the buffer zone (in pixels or %) before the element reaches the screen, 300px is default.
Example: If set to 400px, the Rive resource will begin loading when the user is still 400 pixels away from reaching it.
3. Create Rive animations using Animation builder
Now comes the actual animation part, since we have already exported the rive url and added the rive element to our page, now we will open animation builder and add an animation.
Below video tutorial show how you can access the animation builder, select a page
Below video tutorial show how you can access the animation builder, select a page
where your rive element is added and as an example we will add scrolling animation
to animate our rive element.